

I couldn’t say how many cheeseboards we have constructed over the years at Ivory Table Catering—hundreds for sure. Cheeses in pretty packaged to-go platters, piled high on ornate tiers for wedding receptions, or spread out in lavish grazing arrangements. We have made cheeseboards for just about every occasion.
In this guide, I will walk through a professional caterer’s step-by-step process of creating well-balanced and visually appealing cheese boards every time. I will detail my exact process to reduce preparation time and maximize aesthetics. Whether I’m arranging a cheeseboard for a small gathering with friends or constructing a twenty-foot grazing spread with the Ivory Table Catering team, these same principles hold firm and are applicable. Let’s get started!
Getting Ready: What You Will Need

Choosing the Base and Serving Utensils
The first step will be identifying which surface or board you will use. I call this the “base”. When selecting a base for your cheeseboard, opt for a material that complements the style of your gathering. I love to use large wooden boards for their rustic charm. Marble boards are gorgeous, elegant, and sophisticated. Slate boards have a dramatic pop but can be slightly more prone to smudging with softer cheeses. Don’t get too hung up on what is used for the base; just ensure it has a solid, smooth, and food-safe surface. Even a cookie sheet pan, cutting board, or a piece of butcher paper draped across a table will make a perfect base for your creation.
You will also need some cheese knives, serving utensils, mini dishes, or bowls. A honey dipper and mini spoons also come in handy when serving up sweeter elements – honey, jams, and chutneys. I have collected many of my favorite utensils from antique stores and flea markets. Cost Plus World Market, Target, and Amazon are great spots to grab supplies in a pinch. Don’t forget small plates, napkins, and forks or toothpicks.
Cheeses for your Cheeseboard
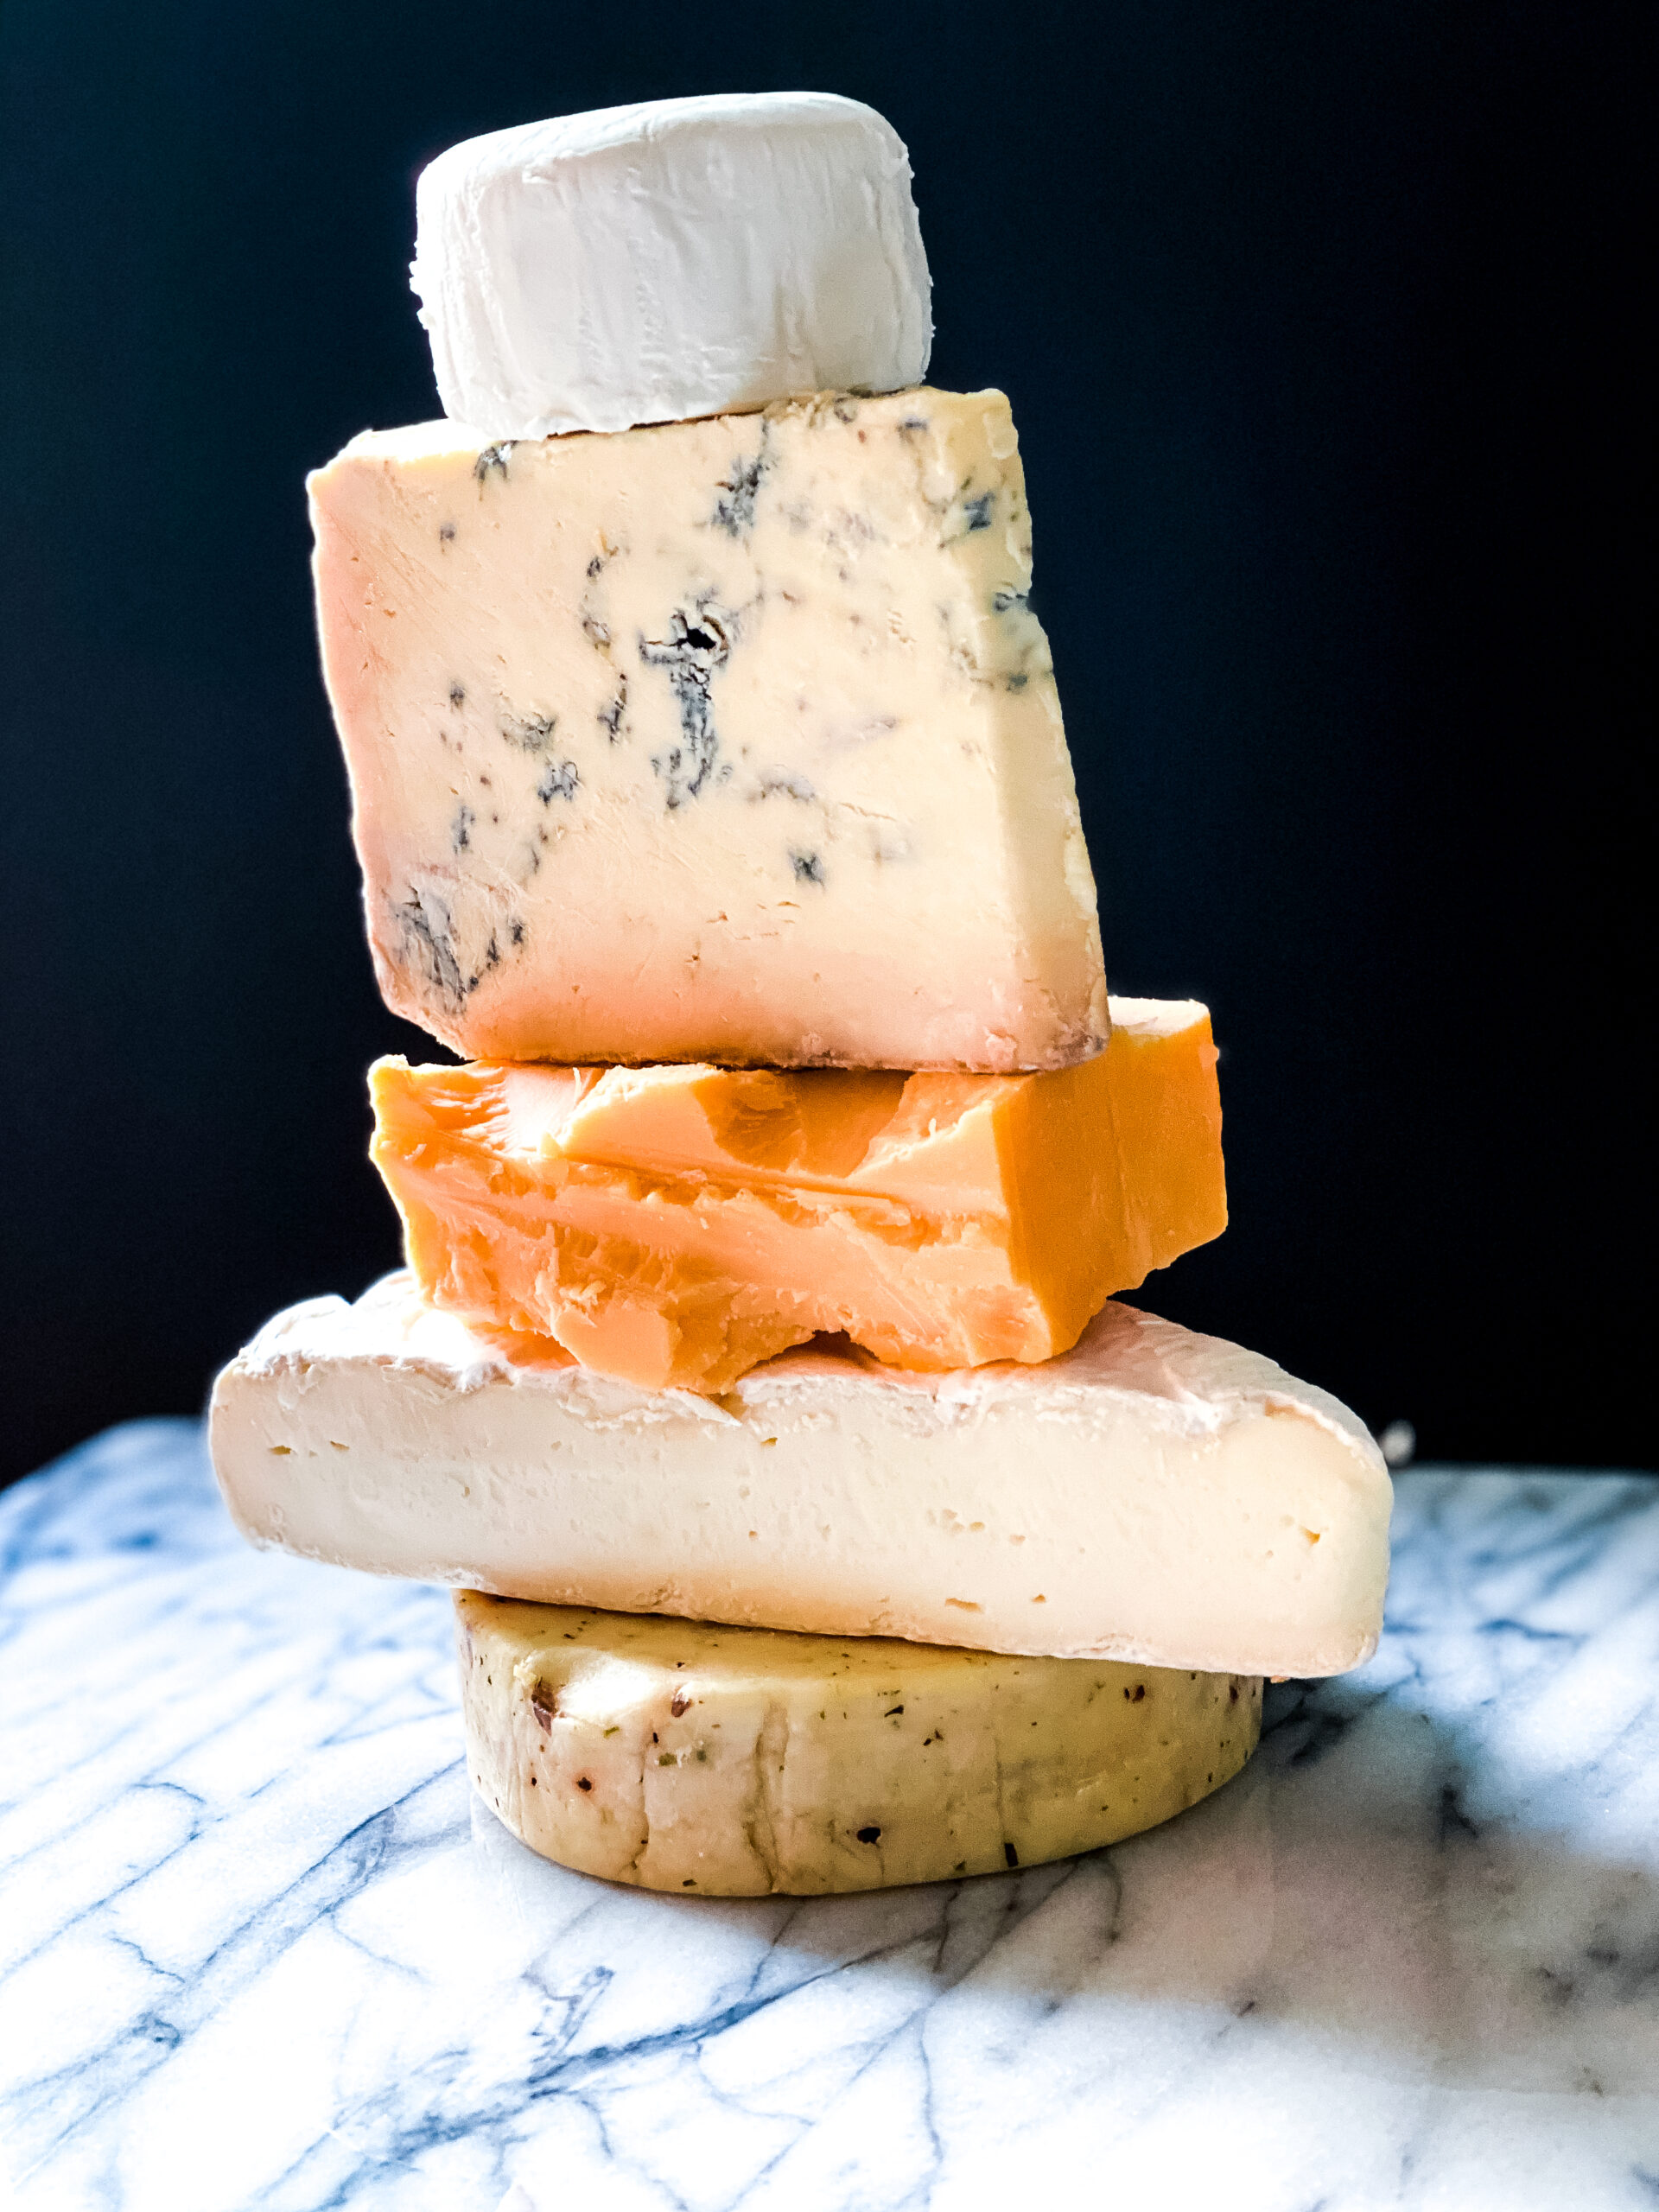
When selecting your cheeses, aim for a variety of flavors and textures. Grab a mix of soft, semi-soft, hard, and blue cheeses for diversity and interest. Soft cheeses like Brie and Camembert offer a creamy texture and a range of flavors and intensity. Semi-soft cheeses like Gouda and Havarti provide a slightly firmer texture with a nutty taste. They can be smoked or include aromatic herbs or truffles. Hard cheeses such as Cheddar and Parmesan have a more pronounced flavor and a crumbly texture.
In contrast, blue cheeses like Roquefort and Stilton add a bold and tangy element to the board. Remember to explore sheep’s milk cheeses like Manchego, Pecorino Romano, and Ossau-Iraty. For me, no cheeseboard is complete without a goat’s milk cheese, fresh or aged: think Humbolt Fog or a creamy chevre.
When choosing your cheeses, consider the occasion and your guests’ preferences. If you’re hosting a casual gathering, choose crowd-pleasing favorites like Cheddar, Gouda, and Goat. Experiment with artisanal cheeses that showcase unique flavors and textures for a more sophisticated affair. Don’t hesitate to ask your local cheesemonger for recommendations or samples to help you make informed choices. DeLaurentis in Seattle, WA, is my absolute go-to when I’m looking for an outstanding cheese selection. They have quick shipping and an incredible staff picks list on their website should you need help getting started.
Pro Tip: Allow cheeses to come to room temperature before serving. This allows the cheese’s flavor and aroma to develop fully. Take your cheeses out of the refrigerator about 30 minutes before using them.

What Goes With Cheese
Sweet, salty, crunchy, tangy, and even bitter are all flavor elements that come to mind when considering what goes nicely on your cheeseboard. Explore the aisles of your local Trader Joe’s or Whole Foods Market, and you will find an extensive array of cheeseboard accouterments. Aim for a balance of flavors. I always like to make sure I have the following on my cheeseboard:
- Something Salty – olives, brined pickles, salted nuts
- Something Sweet – honey, honeycomb, fig jam, fruit chutney, dried fruit, dates, fresh fruit, candied nuts, marmalade, jelly
- Something Crunchy – crackers, nuts, grissini breadsticks, crostini bread
- Something Tangy – sour cherries, pickles of all varieties, brined artichokes
- Something Bitter – dark chocolate, dried citrus, mustard, arugula
Arranging Your Cheeseboard: Step by Step

Step 1: Set Your Anchor Pieces
Step one is always to arrange your “anchor pieces.” This means placing your pieces of cheese on the board in a balanced and visually appealing fashion. Be sure to leave some space between the cheeses. In this step, get creative with shapes. In the picture above, I have used two triangular pieces, small cut rectangular pieces, and a circle piece. If you don’t have a circular cheese, consider placing smaller cut pieces in a circular dish. You can also break harder cheeses into bite-sized pieces with your hands to create another textural element.

Step 2: Build the Beds
The next step will be to “build the beds” on your cheeseboard. This step involves creating little beds of greenery placed strategically around the board. Arugula and kale are my top picks for their sturdiness and ability to hold up visually over time. These little soft spots will serve as pretty green nests for other ingredients and will secure items from rolling off the board. They will also add a pop of color and some depth in texture.
Pro Tip: Never put anything on a cheeseboard that isn’t edible. While some leaves, flowers, branches, or synthetic materials might look nice, including them in the food service area is a significant industry faux pas. Instead, tuck those items into the table display or lay them around the cheeseboard in a decorative fashion. Always make sure guests can safely eat every item on your cheeseboard.
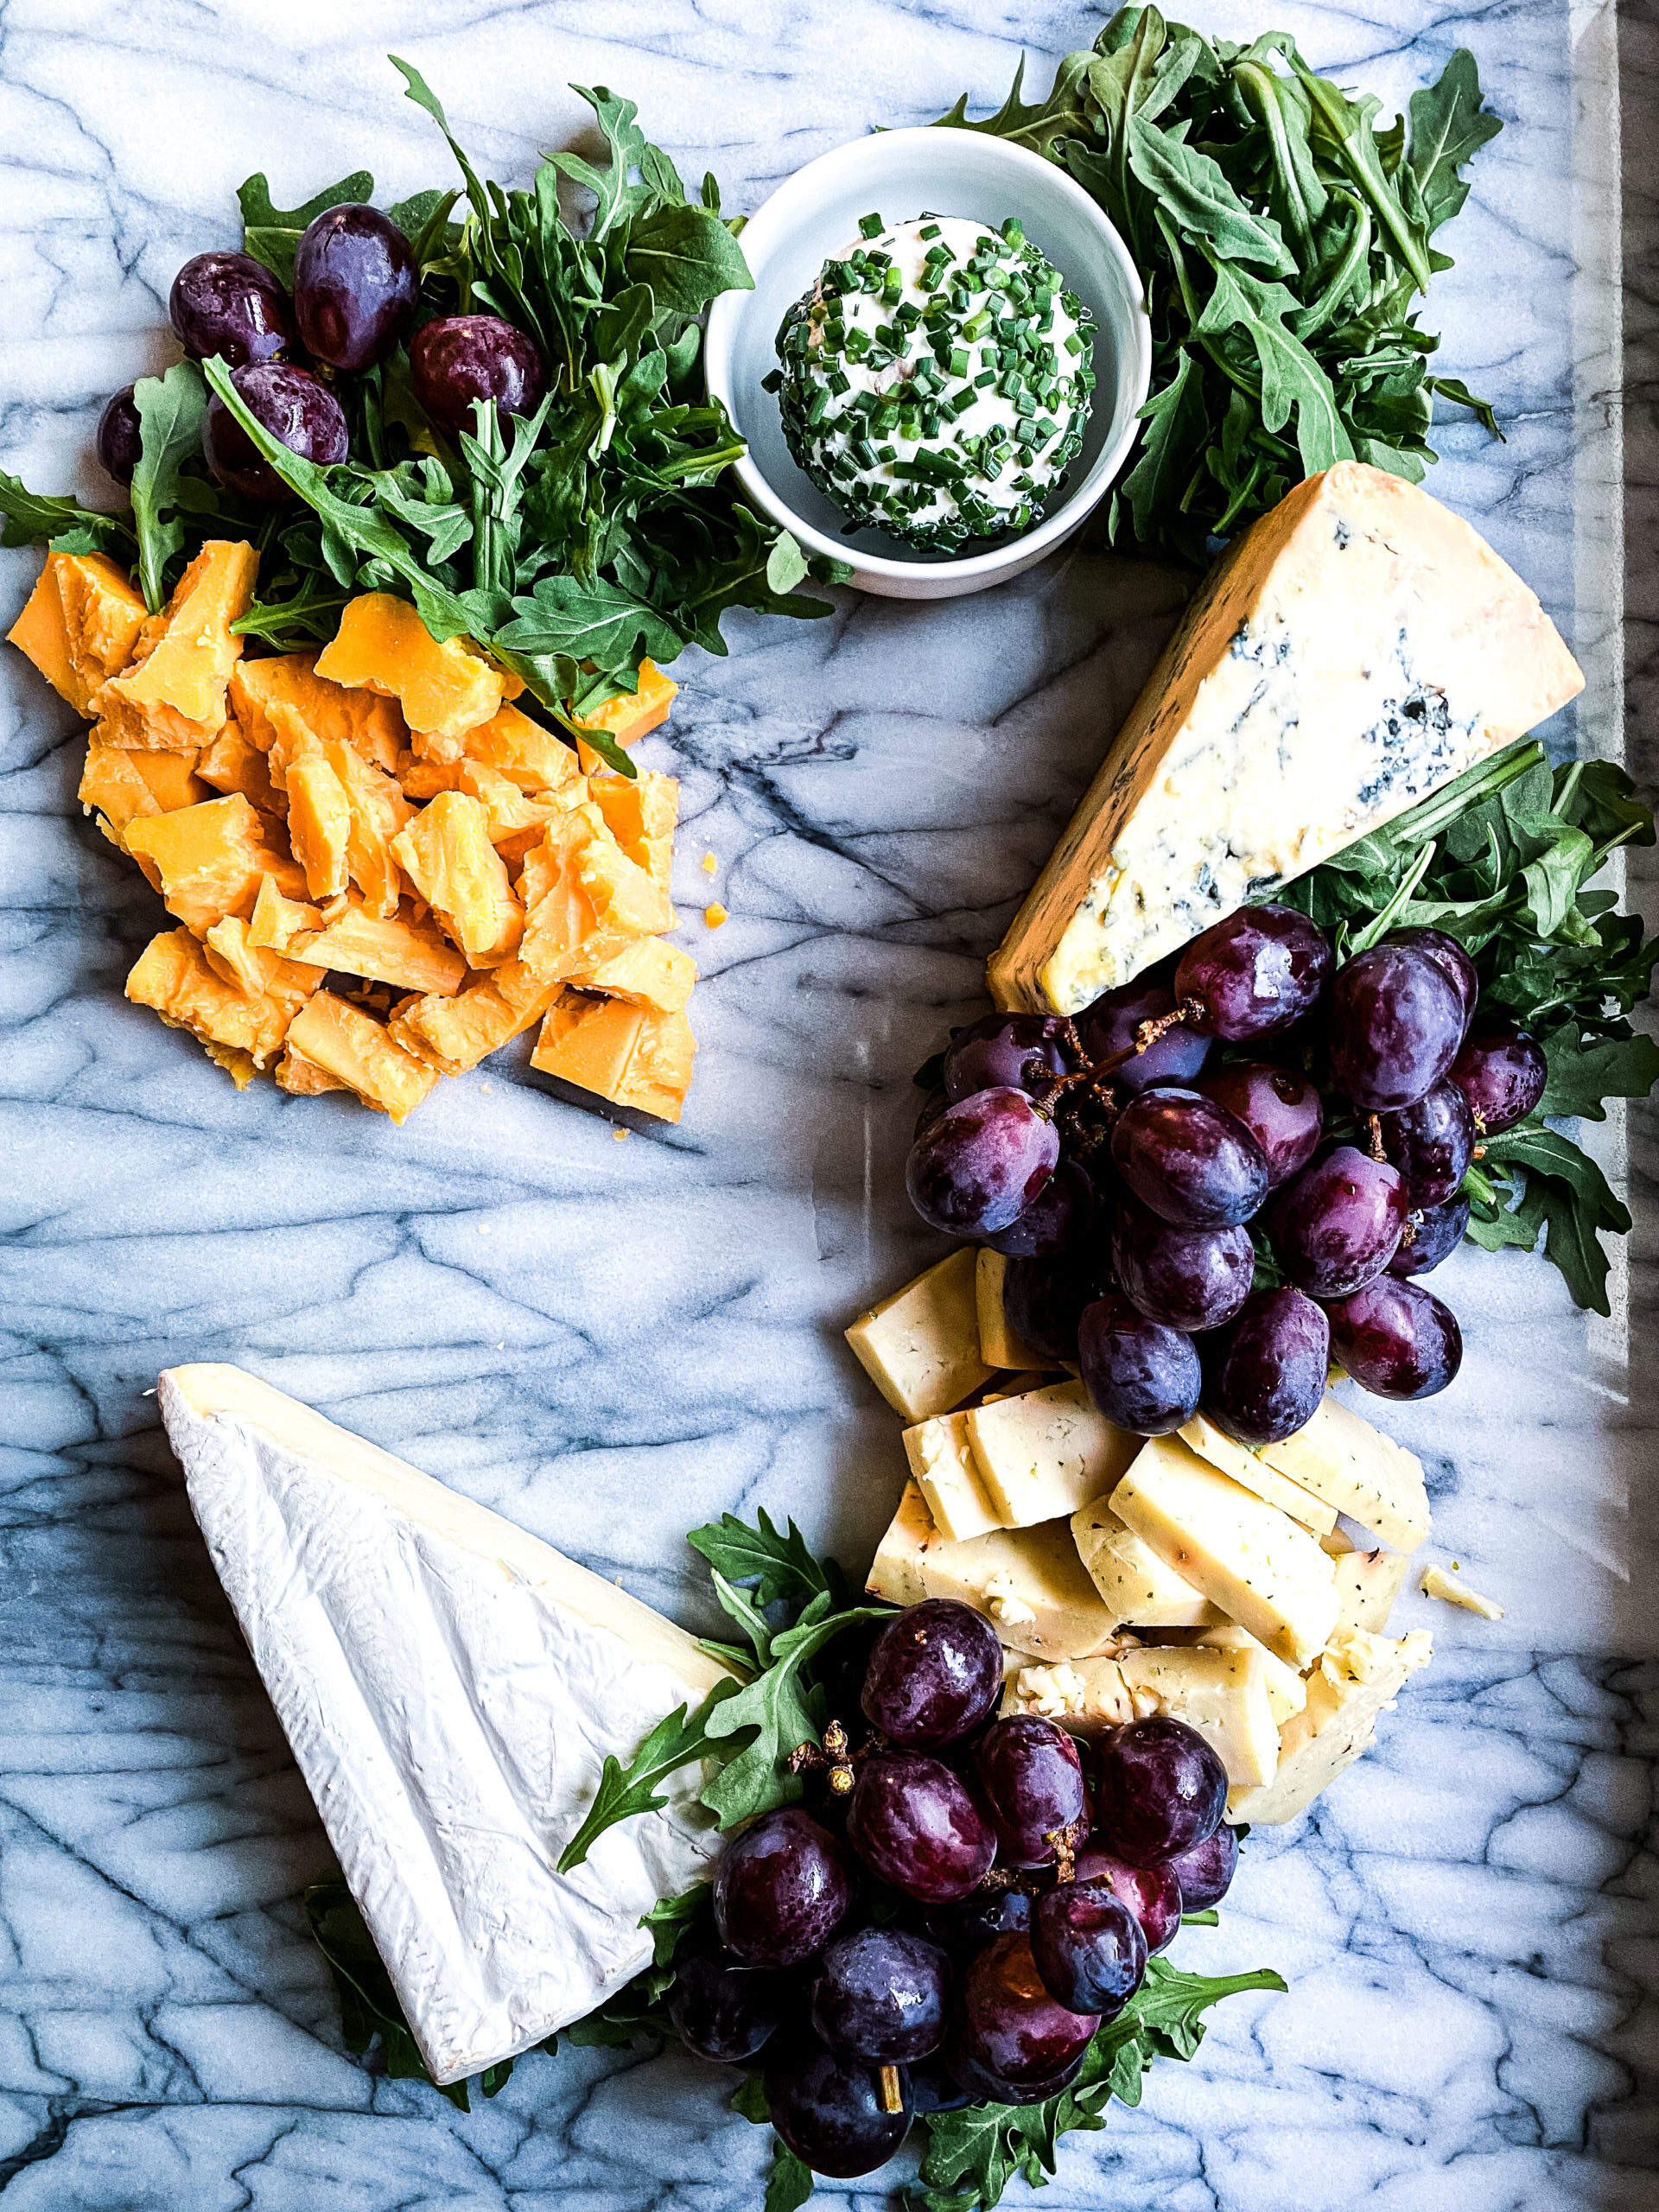
Step 3: Add Fruit
Next, you will add your fruit. I typically place mounds of fruit on top of the green beds. My favorites are grapes, strawberries, figs, dates, apples, and blackberries. I avoid citrus fruits on cheeseboards, as they don’t pair well with cheese.
Pro Tip: If using grapes, snip them into smaller sections ahead of time with a pair of kitchen scissors. This way, guests can quickly grab a small serving.

Step 4: Accompaniments & Arrangement Tips
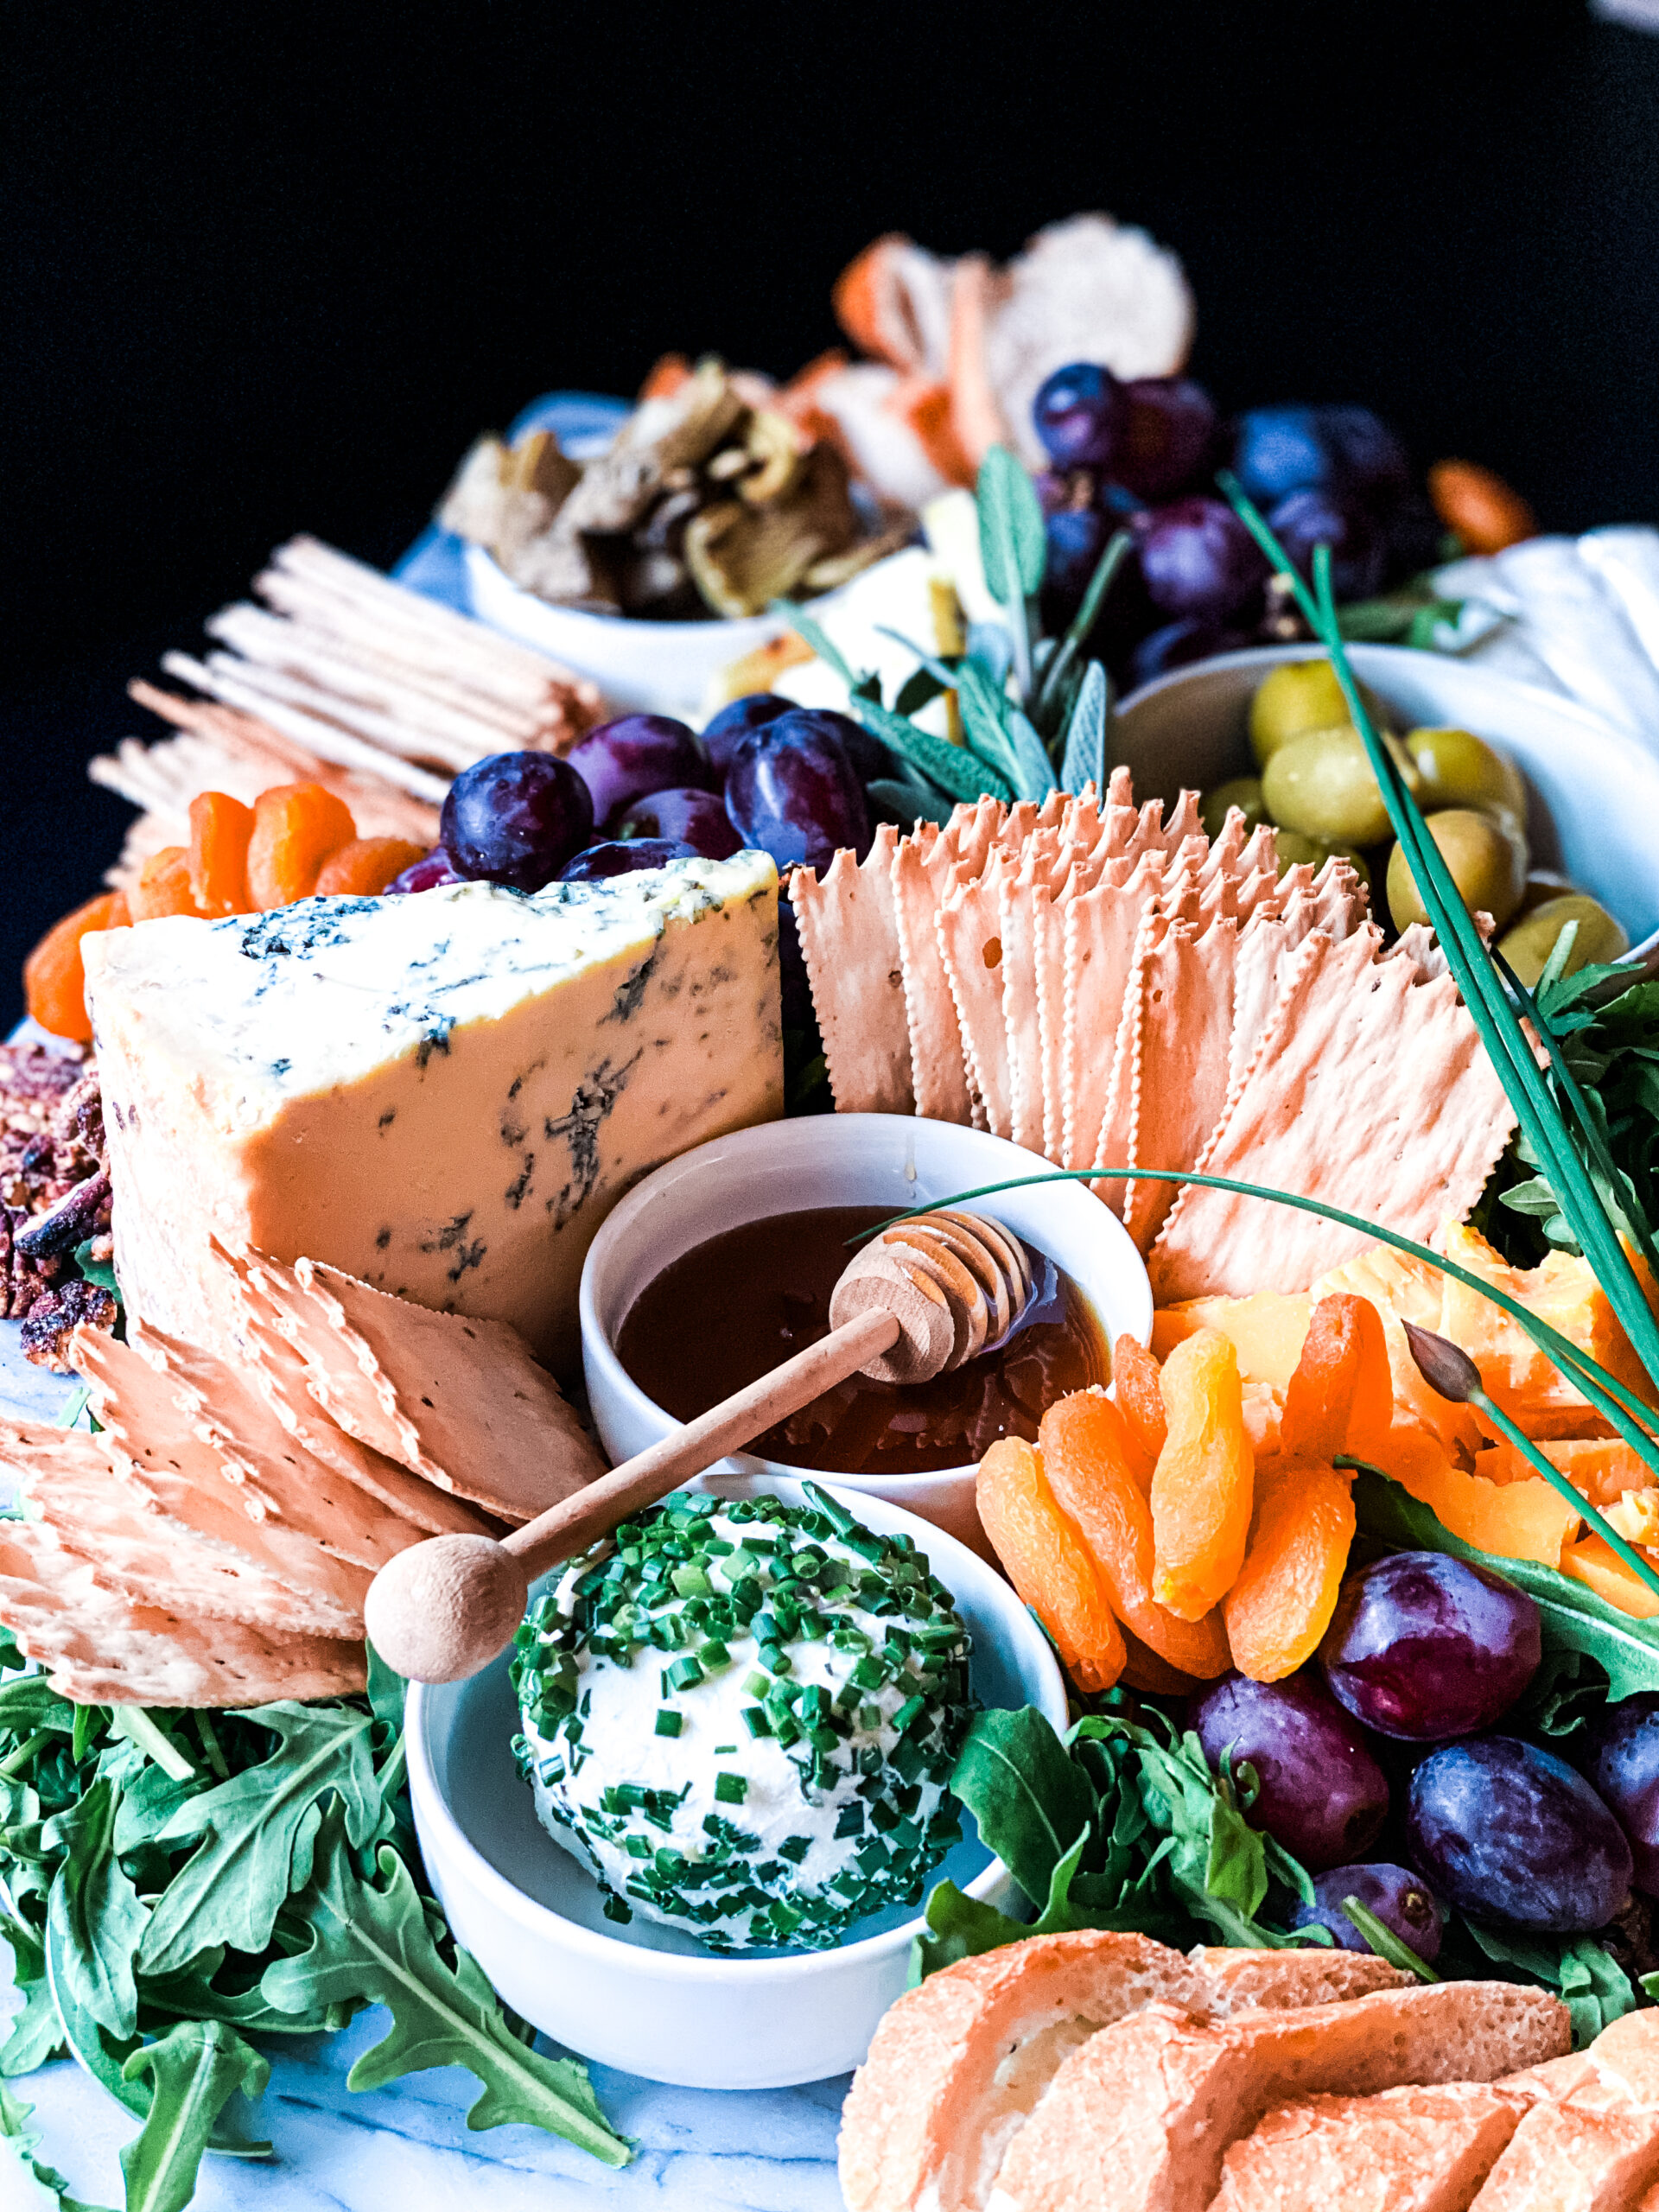
In this step, add any remaining accompaniments: olives, pickles, dishes of jams, jellies, honey, etc. “Dry” accompaniments, such as nuts and olives, can be placed directly on your cheeseboard, but be mindful that sticky jams and juicy items tend to run and smear, which can ruin the look of your board. I like to place those items in small dishes.
Pro Tip: When arranging your cheeseboard, group items together in mounds rather than dispersing items in small bits or pieces around the board. Mounded or grouped items look better over time. They will keep your cheeseboard looking full and beautiful even after guests have begun eating. When items are spread out too far or placed in small bits around the board, your arrangement will quickly look messy and picked over even after just a few guests help themselves.

Step 5: Bread and Crackers
After all essential items (cheeses and accompaniments) have been added to the board, add your bread and crackers. If you run out of space, bread can always be placed in a side dish or basket. In large grazing-style arrangements, we often cascade slices of baguette and crackers off the display board and onto the table for dramatic effect. Place mounds of bread and crackers into any open spaces around the cheeseboard.
Step 6: Garnish
The last step will be to garnish your board. I have used some dried apricots and placed them in small groups around the board. I’ve also added some fresh chives and large sprigs of sage. You can use fresh herbs and edible flowers or place a few cut fresh figs atop your arrangement. Rosemary is always a fabulous choice because of its gorgeous appearance and aromatic qualities. Get creative! But remember, only edible items should be on your cheeseboard. Now that you have created your little masterpiece, it’s time to enjoy it!
Conclusion
Use these tips consistently, and with some practice and experimentation, you’ll become a cheeseboard connoisseur in no time. Get creative, have fun, and bon appetite!
Xoxo
Kristen
4 comments
Amazing. your culinary knowledge and passion for food really come through. Thank you for sharing these expeet tips!
this is AMAZZZZING! so much good info, stunning images, beautiful. wow! the ivory table rocks!!! thanks so much for this incredible post!
ps. i’m getting kinda hungry…
Hi! I simply want to give you a big thumbs up for your great
information you have here on this post. I am returning to your website for
more soon.
I look at several food blogs and websites a week. This is DEFINITELY the most beautiful and well-written! Thank you for the fantastic pictures and the link to DeLaurentis in Seattle. I’ve been there many times… didn’t know they had a “staff picks” of their favorite cheeses on the website. I look forward to many more posts from the Ivory Table